Showing posts with label colored pencil tips. Show all posts
Showing posts with label colored pencil tips. Show all posts
Saturday, May 13, 2017
Friday, May 17, 2013
Wednesday, April 3, 2013
My tip in colored Pencil Magazine
I was honored to be contacted by the creators of "Colored Pencil" magazine, to see if I would allow them to publish my new technique for using colored pencil. Of course I said yes!. Here is the cover and the article. You can purchase their magazine at coloredpencilmag.com. You can also see my original tips on my other blog http://coloredpenciltips.blogspot.com/. Happy dance!
Saturday, March 16, 2013
Wednesday, September 19, 2012
Saturday, August 4, 2012
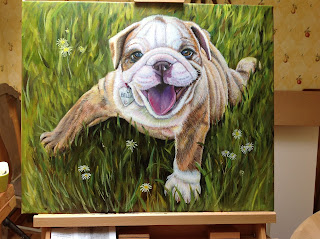
Step 14 final step, painting is finished!
I added the red glazes and this was taken outside in the shade on a sunny day. I also signed the painting. I don't do that until I am totally finished. I am thrilled with how this came out. Now it just has to dry for several more weeks before I can ship it. I hope you enjoyed watching my process. Let me know if you have any questions!
Step 13
I fixed her tag. Much happier. Worked on her belly, adding a nice roundness to it. Made her right foot a bit smaller and left foot a bit larger. added more detail in the grass. Now I start adding some glazes. I thin down my oil paint with a mixture of stand oil, damar varnish and mineral spirits. I only add a touch of color and thin it way down. You can see I've added a bit of yellow and greens to her coat to make it blend well with the grass. Later, I'll add a bit of red the same way. I also lightened up the inside of her ears. Almost there!
Step 11
I have started adding more dark thin strokes that will go under her fur. It's a brindle coat with all sorts of browns and siennas and not really easy to portray. I'll get it slowly to look the way I want. I also added more grass in front of her and beside her. Painting grass is really fun. I often paint with both hands so it looks more irregular. I still haven't got the tummy and back leg and foot to look how I want it. Bulldogs love to lie down with their back legs out straight. It doesn't look too comfortable! Also added more highlights.
Friday, August 3, 2012
Step 8
I go over the darker areas with small strokes of lighter colors to create a nice curve where her many folds of skin are. The body gets some attention and I define the belly folds. There are so many! LOL!! I think I can see a tooth in the photo (it's good to check with the owner because it ended up just being her gums, so I took it out later). More detail on the tongue.
Monday, May 21, 2012
Monday, May 14, 2012
Boston Terrier 4
Moving right along! I'm adding more purples, blues, dark reds and finally some black. I've also added more color on his nose, muzzle and chin. I'm kinda liking him! I need to tone down the highlights on the right side of the face and add more darks and mid tones around the muzzle and the right side. I find it very helpful to put the work away for a day or two and come back to it with fresh eyes. And seeing it on the computer monitor, next to the previous layers, always helps me "see" what changes I want to make.
Saturday, May 12, 2012
Boston Terrier 3
My little boston Terrier is coming along. I've started to define the edges of his skull and ears as well as the many foldes under his chin. I'm increasing the number of layer colors where his fur is black, made up of indigo blue, magenta, dark brown and orange. I will continue to work on the darks vs. lights. I've added a lot more to his nose and muzzle.
Friday, May 11, 2012
Boston Terrier 3
I've started to define the dark areas more with some indigo blue and magenta. I'll slowly work those areas darker, as I add more lights to show contrast. Not happy with the nose yet. Dog noses are really difficult things to draw in case you didn't know. This one already has four or five layers of color!
Subscribe to:
Posts (Atom)


